Creating, Grading and Managing Composite Quizzes
Introduction
The mgiQuiz tag can be used with two types of quizzes, Composite
and Custom.
Composite quizzes are created manually or randomly from questions
entered in the admin mode of the mgiQuiz tag and stored in the
mgiQuiz database. Composite quizzes are graded by the mgiQuiz
tag and quiz results are stored in the mgiQuiz database for later
management.
Custom quizzes are created as "hard-coded"
pages with text, HTML, and form elements. Custom quizzes can
be graded by the mgiQuiz tag, but results are not tracked or
stored. Combining the mgiQuiz tag with a database submit or file
write will allow you to store quiz grades.
In this example, you will create a math quiz from several
different math topics.
MGI Tags
Steps
- Create a quiz administration page and open it in a text editor.
- Insert the mgiQuiz tag in Admin mode.
- Save the quiz administration page.
- FTP the quiz administration page to the web server running
MGI.
- View the quiz administration page in a web browser.
- Create quiz categories.
- Add quiz questions to quiz categories.
- Create a composite quiz.
- Print the quiz form.
- Create the quiz page and open it in a text editor.
- File include the printed quiz form.
- Save the quiz page.
- Create a quiz grading page and open it in a text editor.
- Insert the mgiQuiz tag in Grade mode.
- Save the quiz grading page.
- FTP the quiz page and quiz grading page to the web server
running MGI.
- View the quiz page in a web browser and take the quiz.
- View the quiz administration page in a web browser to manage
quiz grades.
Step 1: Create a quiz administration page and open it in
a text editor.
- Create a page named "quizadmin.mgi" to display
the web-based quiz administration interface. Open the quiz administration
page in a text editing program that allows you to view and modify
the HTML and code of the page.
Step 2: Insert the mgiQuiz tag in Admin mode.
- Insert your cursor after the beginning <BODY> element
and enter the mgiQuiz tag and mode parameter. In the mode parameter,
enter "Admin".
<mgiQuiz mode="Admin">
Step 3: Save the quiz administration page.
- Save the changes you have made to the quiz administration
page.
Step 4: FTP the quiz administration page to the web server
running MGI.
- Upload the quiz administration page from your local computer
to the web server using an FTP program.
Step 5: View the quiz administration page in a web browser.
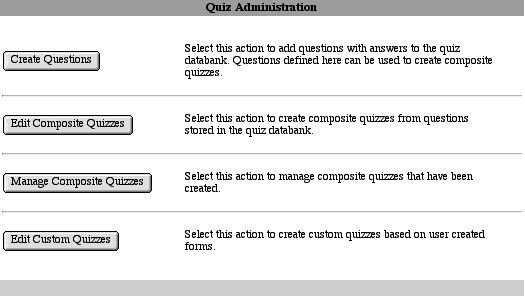
- View the quiz administration page in a web browser. The first
screen of the web-based, administration interface displays four
options: 1) Create Questions 2) Edit Composite Quizzes 3) Manage
Composite Quizzes and 4) Edit Custom Quizzes.

Step 6: Create quiz categories.
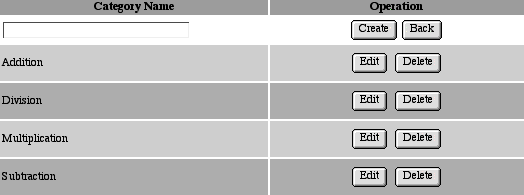
- Click the "Create Questions" button to access the
Quiz Categories. Create new categories of questions. A category
can consist of any grouping of questions such as subjects or
topics within a subject.
-
- To create a new category, enter the category name under the
"Category Name" column and click the "Create"
button. For this example, create four categories of math questions:
"Addition", "Subtraction", "Multiplication"
and "Division".

Step 7: Add quiz questions to quiz categories.
- Populate each quiz category with specific quiz questions.
Click the "Edit" button beside the category name to
display the question management interface for that category.

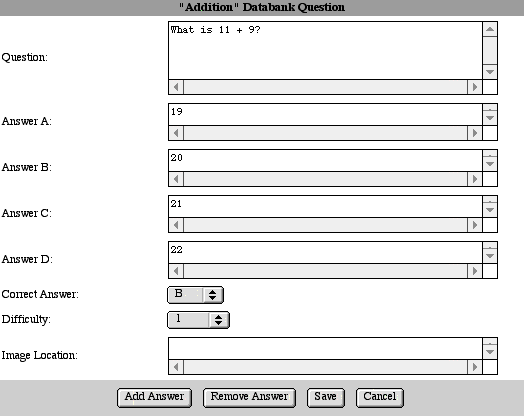
- Click the "New" button to enter a new question,
answers to that question, the correct answer, the question's
difficulty, and an image location for any picture associated
with the question.
-
- In the "Question" field, type the quiz question.
For multiple choice questions, enter all possible answers (correct
and incorrect) in the "Answer" fields. By default,
there are four Answer fields: A - D. To delete an extraneous
answer field, click the "Remove Answer" button. To
add additional answer fields, click the "Add Answer"
button. Questions with more than 8 answers will automatically
display as a pop-up menu rather than as radio buttons.
-
- For a fill-in-the-blank question, remove all but one answer
field and enter the correct answer in the "Answer A"
field. Questions will only one answer will be automatically displayed
as a fill-in-the-blank item.
-
- Select the correct answer for the question in the "Correct
Answer" pop-up menu. The selected correct answer is used
to grade quizzes.
-
- Optionally, select the question difficulty in the "Difficulty"
pop-up menu. When creating a composite quiz, you will have the
option of creating a quiz with a minimum difficulty.
-
- If you wish to display an image for the question, enter the
location of the image relative to the quiz administration page
or as an absolute URL.
-
- Finally, click the "Save" button to add the question
to the quiz database and return to the question management interface.
When you complete the question additions to one category, click
the "Back" button under the "Operation" column
to select another category.
-
- For this example, add quiz questions to the Addition, Subtraction,
Multiplication and Division categories. Click the "Back"
button on the category interface to return to the quiz administration
main menu.

Step 8: Create a composite quiz.
- From the main quiz administration menu, click the "Edit
Composite Quizzes" button to create a new composite quiz
or edit an existing composite quiz.
-
- To create a new quiz, enter the quiz name under the "Composite
Quiz Name" column and click the "Create" button.
For this example, create a quiz named "Math Final".
Quiz names are case-sensitive.
-
- Composite quizzes may be compiled manually via the "Edit"
button and/or randomly via the "Generate" button.
-
- To manually add quiz questions, click the "Edit"
button beside the quiz name. To add a new question:
- Click the "Add" button.
- Click the "Select" button beside the category containing
the question you wish to add.
- Click the "View Question" button beside the question
you wish to add.
- Enter the question number (the next available question number
is entered automatically).
- Enter the point value for the question.
- Click the "Add to Quiz" button.
- Add additional questions from the selected category or click
the "Back" button to choose another category
- When all questions have been added, click the "Back"
button to view and/or edit the composite quiz questions.
- To create an entire quiz randomly OR to randomly add quiz
questions to an existing quiz, click the "Generate"
button beside the quiz name.
-
- Enter the number of questions to add in the "Question
Count" field. Enter the point value for each question in
the "Question Point Value" field (Specific point values
may be edited after the quiz is generated). Select the category
of the questions. To select questions from all categories choose
"All". If you quiz questions have multiple difficulties,
optionally select a minimum and/or a maximium difficulty.
-
- To create an entirely new quiz with the specified criteria,
click the "Generate" button. Clicking
the "Generate" button for a quiz with existing questions
will overwrite all existing questions with the new randomly generated
questions. To add random questions to an existing quiz,
click the "Populate" button.
-
- To review or modify the quiz questions, modify the question
order or modify the question point values, click the "Edit"
button beside the quiz name. To modify the question order, enter
a new number under the "Question #" column and click
the "Update" button beside the quiz question. When
the quiz is "printed", all questions will be ordered
numerically by the question number.
-
- To modify the question's point value, enter a new point value
under the "Point Value" column and click the "Update"
button beside the quiz question.
-
- To review the quiz question, answers and details, click the
"View" button beside the quiz question.
-
- To delete a quiz question, click the "Delete" button
beside the quiz question.
-
- To add a new quiz question, use the manual or random methods
described above.
Step 9: Print the quiz form.
- The "printing" function of the mgiQuiz tag does
not actually print your quiz on your printer. Rather, the "print"
function creates the table, text and other HTML of the quiz form
and saves the quiz as a file on the web server.
-
- Click the "Print" button to select the preferences
for the quiz form. Select the "Single Column Layout"
radio button to save quiz questions in one column. Select the
"Double Column Layout" radio button to save quiz questions
in two columns.
-
- Select the "Name" or "ID" optional input
checkboxes to include a text field for the quiz taker's name
or identification. Select the "Start Date", "End
Date", "Start Time", and "End Time"
checkboxes to track the date and time each quiz is taken.
-
- Select the hours, minutes, and seconds beside "Time
Limit" to time each quiz.
-
- Enter the name of the quiz file and the path to save the
quiz file in the "Output File Name". The quiz name
with the .txt suffix is entered by default. The quiz file is
saved at the same location in the file system as the quiz administration
page by default. To save the quiz file at a different level of
the file system, enter the file path relative to the quiz administration
page before the quiz file name (e.g., "Folder/Quiz.txt"
or "../Folder/Quiz.txt"). For this example, name the
quiz "Math Final.txt"
-
- Click the "Print" button to save the quiz form
to the web server. Once a quiz is "printed",
re-printing a quiz will overwrite the quiz form and delete any
existing grade information from the quiz database.
Step 10: Create the quiz page and open it in a text editor.
- Create a quiz page to include the "printed" quiz
form named "quiz.mgi" and open the quiz page in a text
editing program that allows you to view and modify the HTML and
code of the page.
Step 11: File include the printed quiz form.
- On the quiz page, file include the printed quiz form. Enter
the mgiIncludeFile tag and fileLocation parameter. In the fileLocation
parameter, enter the relative path to the printed quiz form (e.g.,
"Math Final.txt").
-
- After the file include, enter a submit button to post the
quiz form to the grading page.
-
- Enclose the file include and submit button with HTML <FORM>
tags and post the form to the quiz grading page (grade.mgi).
-
<form action="grade.mgi" method="post">

<mgiIncludeFile fileLocation="Math Final.txt">

<mgiButton name="submit" value="Submit Quiz">

</form>
Step 12: Save the quiz page.
- Save the changes you have made to the quiz page.
Step 13: Create a quiz grading page and open it in a text
editor.
- Create a quiz grading page named "grade.mgi" to
grade the quiz and open the quiz grading page in a text editing
program that allows you to view and modify the HTML and code
of the page.
Step 14: Insert the mgiQuiz tag in Grade mode.
- On the quiz grading page, enter the mgiQuiz tag and name
parameter. In the name parameter, enter the name of the quiz
to grade (e.g., "Math Final").
Your quiz grade is <mgiQuiz name="Math Final">.
Step 15: Save the quiz grading page.
- Save the changes you have made to the quiz grading page.
Step 16: FTP the quiz page and quiz grading page to the web
server running MGI.
- Upload the quiz page and quiz grading page from your local
computer to the web server using an FTP program.
Step 17: View the quiz page in a web browser and take the
quiz.
- View the quiz page in a web browser. Complete the quiz and
click the "submit" button. Your grade appears on the
quiz grading page and your quiz information is added to the quiz
database.
Step 18: View the quiz administration page in a web browser
to manage quiz grades.
- Vew the quiz administration page (quizadmin.mgi) in a web
browser and click the "Manage Composite Quizzes" button
to view or export quiz grades. Click the "View Grades"
button to view the name and score for each quiz. Click the "View
Details" button to view the details for each quiz including
the name, identification, time lapse, timeout, grade and answers.
-
- To export the quiz grades, click the "Export" button.
Select the quiz information to export by checking "Export
Options". Enter the file name of the quiz export file in
the "Export File Name" field. To save the quiz export
file at a different level of the file system, enter the file
path relative to the quiz administration page before the quiz
export file name (e.g., "Folder/QuizExport.txt" or
"../Folder/QuizExport.txt"). For this example, name
the export "Quiz Export.txt". Quiz details are exported
as tab-delimited files with field name headers.
|


