HTTP File Upload
Introduction
Files can be transferred from your local computer to a web
server via serveral means. One is standard FTP (File Transfer
Protocol). FTP requires an FTP application on your local computer
and an FTP server on the machine you are transferring files to.
To accomplish the same task you can use HTTP file upload. Rather
than transferring files from your local machine to a server using
an FTP application, you transfer files using your browser and
MGI places those files in a designated location on the web server.
HTTP file uploads are preferable for clients who do not know
how to use FTP, anonymous file uploads, group projects, etc.
Using MGI's HTTP file upload, you may specify which files to
accept and deny all others to keep your web site secure.
Access to HTTP file upload and a specified upload location
must be configured in the Domain
Admin on a region basis.
In this example, configure a region to upload files to a folder
on the server named "images".
MGI Tags
Steps
- Configure the region for file upload.
- Create a file upload form.
- Create an upload results page and open it in a text editor.
- Insert the mgiPostArgument tag.
- Save the upload results page.
- FTP the file upload form and upload results page to the web
server running MGI.
- View the file upload form.
Step 1: Configure the region for file upload.
- Access the domain admin page for the domain where files will
be uploaded.
-
- To access the domain admin page, access the "MGIDomainAdmin.xxx"
page in a web browser from one of the domain's virtual host addresses.
Replace the ".xxx" suffix with any suffix that is mapped
to be processed by MGI2. For example, if you have the ".mgi"
extension mapped to be processed by MGI2 you would access "MGIDomainAdmin.mgi"
or if you have the ".html" extension mapped to be processed
by MGI2, you would access "MGIDomainAdmin.html".
-
- The domain admin page is password-protected. When a domain
is created, the domain admin username and password are those
of the current server admin and password.
-
- Click the "Region Management" link. Select the
region to configure for file upload. Highlight the forward slash
"/" for the default region or the region name in the
region list and click the "Edit" button.
- In the file upload section, enter the maximum file size,
path information, and regular expressions for authorized files.
-
- By default, a file of any size can be uploaded. To limit
the size of uploaded files, enter the maximum file size in kilobytes.
Remember, a megabyte is 1024 kilobytes!
-
- By default, files are uploaded to the root of the region.
To specify a different folder, enter the path to the folder relative
to the selected region. The folder
path must be below the level of the selected region. If
a folder does not exist, MGI will create it automatically. For
this example, files will be saved in the "images" folder.
-
- By default, all files that you try to upload are denied.
Enter regular expressions that match authorized file names. The
uploaded file name will be checked against the regular expressions
until a match is found or until all expressions have been checked.
Files that are not authorized for upload will be deleted and
will not be written to the server. To allow any file to be uploaded,
enter a single period (.) in the regular expression box. See
the regular
expression reference for more information and examples. For
this example, only files ending with .jpg, .jpeg, or .gif will
uploaded to the images folder.
-
- By default, all IP addresses that attempt to upload files
are denied access. To allow or deny an IP address, enter an IP
filter in the "IP filter list". To allow an IP address,
enter an "A" followed by a colon and the allowed IP
address (e.g., "a:198.2.152.111"). To deny an IP address,
enter a "D" followed by a colon and the denied IP address
(e.g., "d:198.3.145.200"). You may use an asterisk
(*) for a wildcard value in any position of the IP address. A
wildcard value allows you to match of range of IP addresses.
For example, to allow all IP addresses from the 198 Class C block
you would enter "a:198.*.*.*" in the IP filter list.
For multiple filters, enter one filter per line. When a file
upload request is received, the most restrictive match for the
IP address will be processed and if two filters match, a deny
filter will override an accept filter. For example, if you wish
to allow all IPs from the 198.3.145 address except the IP address
"198.3.145.201", then you would enter an allow and
deny statement in the IP filter list ("a:198.3.145.*"
and "d:198.3.145.201"). To allow all IP addresses,
use wildcard values for all positions (i.e., "*.*.*.*").
-
- Click the "Save" button to save the region preferences
including the file upload preferences.

Step 2: Create a file upload form.
- Create a form named "upload.mgi" to select and
enter the file to upload. The file upload form field may be combined
with any other type of form fields, however the form method must
be post and the form encoding type must be "multipart/form-data".
-
- Enter an HTML input tag, type parameter and name parameter.
In the type parameter, enter "file". In the name parameter,
enter the name of the post argument for the file upload. The
post argument can be checked on the results page to determine
if the file had to be renamed or to determine if there was an
error uploading the file. A file input creates a text field with
a "Browse" button.
-
- Enter a submit button with the value "Submit Image".
-
- Enclose all form elements with HTML <FORM> tags. The
form method must be "Post" (posted to the "results.mgi"
page in this example) and the form encoding type (ENCTYPE) must
be "multipart/form-data".
-
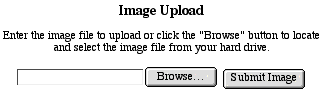
- The following example is an image upload page
<FORM ACTION="results.mgi" METHOD="POST"
ENCTYPE="multipart/form-data">

<CENTER>

<H3>Image Upload</H3>
<P>Enter the image file to upload or click
the "Browse" button to locate and select the
image file from your hard drive.</P>

<input type="file" name="imageFile">
<mgiButton value="Submit Image">

</CENTER>

</FORM>
- The form in this example would display the following.
Step 3: Create an upload results page and open it in a text
editor.
- Create a page named "results.mgi" to display the
results of the file upload. Open the upload results page in a
text editing program that allows you to view and modify the HTML
and code of the page.
Step 4: Insert the mgiPostArgument tag.
- When a file is successfully uploaded, the final file name
can be displayed with the mgiPostArgument tag. If an upload file
name is a duplicate of an existing file name, the new file name
is appended with a number before the final period (i.e., before
the file extension).
-
- If an error occurs while uploading a file, the post argument
will be empty (i.e., not exist). An error may occur if the file
exceeds the maximum file size or does not match any of the specified
regular expressions.
-
- Check the post argument with a conditional and display the
results if the post argument is not empty.
-
- In this example, the post argument is named "imageFile".
<mgiIf lhs={mgiPostArgument name="imageFile"}
relationship="isNotEmpty">

<P>Your file has been uploaded.  The file name for your
upload is <mgiPostArgument name="imageFile">.

<mgiElse>

<p>An error has occurred during your file upload.  Please
make sure that the file is an image that ends with .jpg,
.jpeg or .gif.  The file size should not exceed 15 MB.
</mgiIf>
Step 5: Save the upload results page.
- Save the changes you have made to the upload results page.
Step 6: FTP the file upload form and upload results page
to the web server running MGI.
- Upload the file upload form and upload results page from
your local computer to the web server using an FTP program (at
least until you implement the HTTP upload :).
Step 7: View the file upload form.
- View the file upload form in a web browser. Enter the file
name to upload or use the "browse" button to locate
and select the file on your hard drive. Click the "Submit
Image" button.
|