Creating a Database and Database Fields
Introduction
Creating databases, adding the database field structure and
adding database records is accomplished with one page and the
mgiEditDatabase tag.
MGI Tags
Steps
- Create a database administration page in a text editor.
- Insert the mgiEditDatabase tag.
- Save the database administration page.
- FTP the database administration page to the web server running
MGI.
- View the database administration page in a web browser.
- Enter the name of a new database.
- Add each database field.
- Add database records.
Step 1: Create a database administration page in a text editor.
- Create a new page in a text editing program to display the
web-based, database administration interface.
Step 2: Insert the mgiEditDatabase tag.
- On the database administration page, enter the mgiEditDatabase
tag.
<mgiEditDatabase>
Step 3: Save the database administration page.
- Save the database administration page and name it "dbadmin.mgi".
Step 4: FTP the database administration page to the web server
running MGI.
- Upload the database administration page (dbadmin.mgi) from
your local computer to the web server using an FTP program.
Step 5: View the database administration page in a web browser.
- View the database administration page (dbadmin.mgi) in a
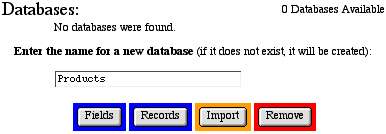
browser. The first screen of the web-based, administration interface
is displayed:
Step 6: Enter the name of a new database.
- Below the sentence "Enter the name for a new database
(if it doesn't exist, it will be created):" enter the name
of a new database ("Products" in this example). Remember, database names are case-sensitive.
Click the "Fields" button to create the new database
and proceed to the field screen of the interface. New databases
are unique to and available to all files in the region in which
they are created.
Step 7: Add each database field.
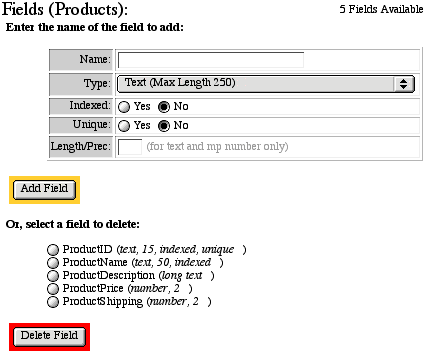
- In the field screen of the administration interface, enter
a name, type, index selection, uniqueness selection, and length/precision
for each database field. Before creating the fields, consider
what type of information will be entered in the database records.
Your database structure can be changed after you create the field
structure, but it is easier to plan ahead for each piece of information
that you need.
-
- Once you have decided which fields to include in the database,
consider the type of information that will be entered in each
field. An MGI database field can contain the following types
of information:
- True/False (Boolean): a field containing the values
"True" or "False" to discriminate records.
- Whole Number (Integer): a whole number field can contain
only whole numbers without decimals such as quantities, etc.
- Positive Number (Unsigned Integer): a positive number
field can contain only positive whole numbers without decimals
such as years, etc.
- Decimal Number (Multi-Precision Float): a decimal
number field can contain decimal numbers with multiple decimal
places such as prices, weights, tax rates, percents, etc. Enter
the number of decimal places in the "Length/Prec" box
when creating a Decimal Number field.
- Text (Max Length 250): a text field can contain up
to 250 alpha-numeric characters. Enter the maximum number of
characters (up to 250) in the "Length/Prec" box when
creating a text field. The default length is 25 characters.
- Long Text: a long text field can contain text that
is greater than 250 alpha-numeric characters, but the information
in a long text field cannot be used for ordering and cannot be
designated as unique.
-
- Next, consider which fields may be need to be searched (in
the database record administraton screen or using an mgiSearchDatabase
tag) or used to order database search results. Any field that
you want to search or use for ordering search results must be
indexed when you create the field. Creating an indexed field
does not predetermine the order of your search results; it only
allows you to order results by that criteria. The order of results
is actually specified in the mgiSearchDatabase tag. Indexing
fields does add some overhead to the searching process, so only
index fields that you need to use for searching or ordering search
results. Do not index every field!
-
- Finally, consider whether information in the field should
be designated as unique. Unique fields do not allow duplicate
information (including multiple records with blank information
in the unique field). For example, you may want to insure that
Product Indentification numbers are unique.
-
- To create a field, enter the case-sensitive
field name in the area labeled "Name". The length of
field names in the internal MGI database is limited according
to the type of field and operating system. All field names that
are not indexed are limited to 63 characters. The limit for non-indexed
field names applies to all operating systems. Indexed field names
on Macintosh operating systems 9.04 and prior are limited to
25 characters. Indexed field names on all supported Windows operating
systems are limited to 63 characters.
-
- Select a field type from the pop-up menu labeled "Type".
Select "Yes" beside the "Indexed" label if
the field will be searched or used to order database search results.
Select "No" beside the "Indexed" label if
the field will not be searched or used to order database search
results. Select "Yes" beside the "Unique"
label if the contents of the field are required to be unique.
Select "No" beside the "Unique" label if
the contents of the field are not required to be unique. For
text field types and decimal number field types, enter the maximum
number of characters or the number of decimal places, respectively,
in the area labeled "Length/Prec". Click the "Add
Field" button to add the field to the database. Fields are
listed in the order they are created below the new field interface.
-
- In this example, fields for a product database were created:
Step 8: Add database records.
- Return to the main database administration screen by entering
and viewing the database administration page (dbadmin.mgi) page
in a web browser. Select the radio button beside the database
you wish to populate and click the "Records" button.
If no records are present, the "New" and "Import"
buttons are displayed. Click the "New" button to add
a database record.

-
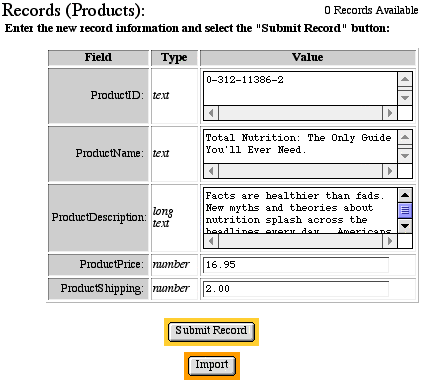
- On the new record screen of the database administration interface,
enter information in each field and click the "Submit Record"
button to save the new data.
- After submitting a new record, the message "Record successfully
added" displays and allows you to enter additional new records
at the new record screen of the database administration interface.
Enter new records following the directions above until all information
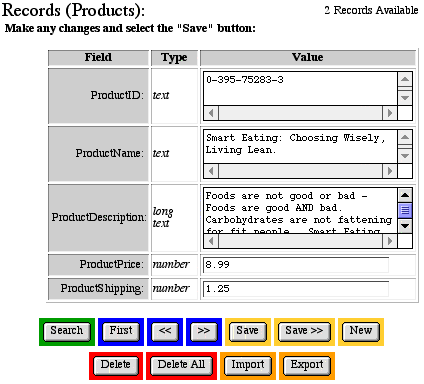
has been added. To view the records, click the "First"
button and then click the ">>" (Next) and "<<"
(Previous) buttons to browse the records.
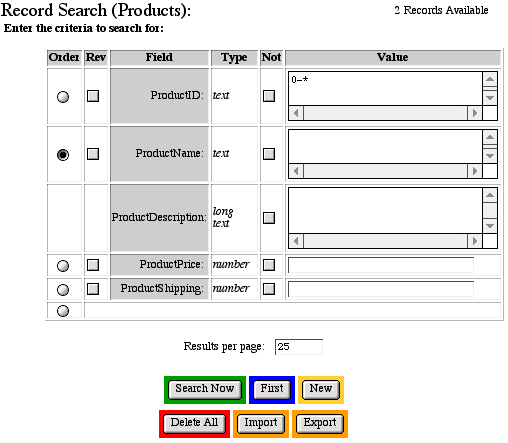
- To locate records, click the "Search" button, enter
search criteria into any indexed field and click the "Search
Now" button. Use an asterisk * for wildcard and partial
searches (see example below). Select the radio button under the
"Order" column to order search results by the selected
field. Check the box under the "Rev" column beside
the field you have selected in the "Order" column to
reverse the order of search results. If no ordering is selected,
search results are displayed in the ordered they were entered
into the database. If a field is ordered, search results are
ordered in ascending order (A to Z, smallest to largest) by default.
If a field is ordered and reversed, search results are ordered
in descending order (Z to A, largest to smallest). When results
are displayed, select the radio button beside any search result
and click the "View" button to view the full record.
- To update a record, browse to view the record or locate and
view the record via a search. While viewing the record, make
changes in any field and click the "Save" button to
save the changes and reload the record or click the "Save
>>" button to save the changes to the existing record
and advance to the next record.
-
- When viewing a record, click the "Delete" button
to delete that record. Click the "Delete All" button
on any screen to delete all records in the database.
Comments and Notes
The mgiEditDatabase tag gives you and anyone who views the
page in a web browser access to modify databases. Keep your databases
secure by password-protecting
the database administration page with an mgiAuthenticate
or mgiAuthenticateDB
tag.
|


