Scheduling and Displaying Banner Ads
Introduction
Banner ads are text and/or graphics advertisements for services,
products, or web sites. Banner ads are usually sold by a block
of impressions (hits) or click-throughs during a specific period
of time. For example, if your web site receives 10,000 hits per
month, you might sell 10 banner ad clients 1,000 impressions
each on a monthly contract. The mgiBannerAd tag allows you to
sell create and display groups of banner ads for different locations
on a web page, for example.
In this example, 2 banner ads are added to the top of a home
page.
MGI Tags
Steps
- Create a banner ad administration page and open it in a text
editor.
- Insert the mgiBannerAd tag in Admin mode.
- Save the banner ad administration page.
- FTP the banner ad administration page to the web server running
MGI.
- View the banner ad administration page.
- Add new banner ads.
- Open the home page in a text editor.
- Insert the mgiBannerAd tag in Display mode.
- Save the home page.
- FTP the home page and the banner ad images to the web server
running MGI.
- View the home page in a web browser.
Step 1: Create a banner ad administration page and open it
in a text editor.
- Create a page named "banneradmin.mgi" to display
the web-based banner ad interface. Open the page in a text editing
program that allows you to view and modify the HTML and code
of the page.
Step 2: Insert the mgiBannerAd tag in Admin mode.
- Insert your cursor after the beginning <BODY> element
and enter the mgiBannerAd tag and mode parameter. In the mode
parameter, enter "Admin":
<mgiBannerAd mode="Admin">
Step 3: Save the banner ad administration page.
- Save the changes you have made to the banner ad administration
page.
Step 4: FTP the banner ad administration page to the web
server running MGI.
- Upload the banner ad administration page from your local
computer to the web server using an FTP program.
Step 5: View the banner ad administration page.
- View the banneradmin.html page in a web browser. The first
screen of the web-based, administration interface is displayed.
Step 6: Add new banner ads.
- The first screen of the banner ad administration allows you
to add or import banner ads (or search for banner ads if they
already exist).
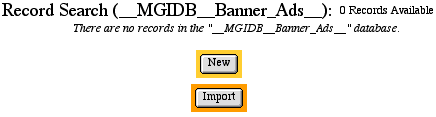
-
- To add a new banner ad, click the "New" button.
On the new banner ad screen, enter information about the banner
ad in the following fields.
- Group. The name of the group that the banner ad rotates
with. A group may be a location on a page or any other organization
of banner ads.
- Client: The name of the company or individual purchasing
the banner ad. The client name is for your record keeping purposes
and will be used when displaying client statistics.
- Ad Name: The name of the banner ad. This does not
have to be the name of the image file. The ad name is for your
record keeping and banner differentiation purposes only.
- Sales Method. Select "Impressions" to sell
the banner ad by a block of hits (impressions). Select "Click
Thrus" to sell the banner ad by the number of click-throughs
from your site to the banner ad link.
- Projected Hits: If you select the"Impressions"
sales method, enter the projected (sold) hits for the banner
ad over the time period specified in the start and end date.
Before selling banner ad space, you should get traffic reports
for your web site to help you estimate the total hits that are
available for sale.
- Projected Clicks. If you selected the "Click
Thrus" sales method, enter the projected (sold) clicks for
the banner ad over the time period specified in the start and
end date.
- Start Date: The month, day and 4-digit year that the
banner ad should be placed in rotation.
- End Date: The month, day and 4-digit year that the
banner ad should be taken out of rotation.
- HTML Code: The HTML code including text, image sources
and links that will display for the banner ad.
- Impressions: The total number of times the ad has
been displayed on a page. The impressions are calculated automatically
by mgiBannerAd and should not be entered for new banner ads.
- Click Thrus: The total number of times a user has
clicked the banner ad and linked to the URL specified in the
HTML Code. The click thrus are calculated automatically by mgiBannerAd
and should not be enetered for new banner ads.
- After submitting a new banner ad, the message "Record
successfully added" displays and allows you to enter additional
banner ads at the new banner screen. For this example, enter
2 banner ads with the following information:
-
- Saturn Banner Ad:
- Group: Top Home
- Client: Saturn
- Ad Name: L300
- Sales Method: Impressions
- Projected Hits: 10000
- Start Date: 12/01/2000
- End Date: 12/31/2000
- HTML Code: <a href="http://www.saturn.com" target="_blank"><img
src="saturn.gif" border="0"></a>
-
- Lexus Banner Ad:
- Group: Top Home
- Client: Lexus
- Ad Name: AmEx
- Sales Method: Impressions
- Projected Hits: 10000
- Start Date: 12/01/2000
- End Date: 12/31/2000
- HTML Code: <a href="http://www.lexus.com" target="_blank"><img
src="lexus.gif" border="0"></a>
-
- To view banner ads in the database, click the "First"
button and use the ">>" (Next) and "<<"
(Previous) buttons to browse through the records.
-
- To locate specific banner ad records, click the "Search"
button and enter search criteria into the "Group",
"Client" and/or "Ad Name" fields (other fields
cannot be searched) and click the "Search Now" button.
Use an asterisk * for wildcard and partial searches. Select the
radio button under the "Order" column to order search
results by the selected field. Check the box under the "Rev"
column beside the field you have selected in the "Order"
column to reverse the order of search results. If no ordering
is selected, search results are displayed in the ordered they
were entered into the database. If a field is ordered, search
results are ordered in ascending order (A to Z, smallest to largest)
by default. If a field is ordered and reversed, search results
are ordered in descending order (Z to A, largest to smallest).
When results are displayed, select the radio button beside any
search result and click the "View" button to view the
full record.
-
- To update a record, browse to view the record or locate and
view the record via a search. While viewing the record, make
changes in any field and click the "Save" button to
save the changes.
-
- When viewing a record, click the "Delete" button
to delete that record. Click the "Delete All" button
on any screen to delete all records in the database.
-
- Close the banner ad administration page when all banner ads
are entered correctly.
Step 7: Open the home page in a text editor.
- Open the home page in a text editing program that allows
you to view and modify the HTML and code of the page.
Step 8: Insert the mgiBannerAd tag in Display mode.
- Insert your cursor where you want banner ads to appear and
enter the mgiBannerAd tag, group parameter and rotation parameter.
In the group parameter, enter the group name "TopHome".
In the rotation parameter, enter "Random" to have the
banner ads rotate randomly and enter "Sequential" to
have the banner ads rotate sequentially. Banner ads rotate randomly
by default.
<mgiBannerAd group="TopHome" rotation="Random">
Step 9: Save the home page.
- Save the changes you have made to the home page.
Step 10: FTP the home page and the banner ad images to the
web server running MGI.
- Upload the home page and the banner ad images (saturn.gif
and lexus.gif in our example) to the web server running MGI.
Step 11: View the home page in a web browser.
- View the home page in a browser. At the top of the page,
either the Saturn banner ad or the Lexus banner ad appears. If
you reload the page, a new (not necessarily different) banner
ad appears. An algorithm that accounts for the number of banner
ads, the length of banner ad contracts and the projected hits
or clicks determines which banner ad from the set is displayed
when the page is accessed.
Comments and Notes
The mgiBannerAd tag in Admin mode gives access to modify banner
ad records. Keep your banner ads secure by password-protecting
the banner ad administration page with an mgiAuthenticate
or mgiAuthenticateDB
tag.
|